Zerynth Studio
Zerynth Studio is an integrated development environment (IDE) that runs on Windows, Linux and Mac.
Through Zerynth Studio all the supported boards can be managed and programs can be developed in Python 3 or hybrid C/Python. Projects developed with Zerynth Studio can be saved locally or pushed as private git repository to the Zerynth backend.

Zerynth Studio includes:
-
A code editor with syntax highlighting, multi-tab support, code auto-completion and error highlighting features;
-
A seamless integration of all the Zerynth Toolchain commands;
-
Board discovery and management;
-
Multiple serial port monitors;
-
Git integration;
-
Tens of code examples.
The Zerynth Studio interface is divided into functional areas:
-
The Toolbar
-
The Code Editor
-
The Left Panel
-
The System Log
-
The Footer bar
The Toolbar
The Toolbar is placed at the top of the Zerynth Studio window just under the system menubar.

It contains two separate sections; on the left side there is the list of opened projects with the current one highlighted. Buttons to compile, uplink and debug the current project lie just to the right of it. At the center of the toolbar there is the device management widget, whereas to the right of the screen, an account button allows accessing the user profile and assets.
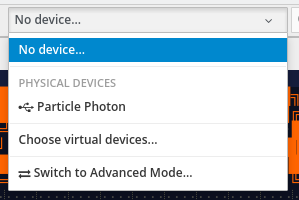
Device Management Widget
Zerynth Studio automatically recognizes connected devices, being them development boards, usb to serial converters or board programming tools. The connected devices are listed in the device management widget. The currently selected device will be used as a target device by the compiler and the uplinker.
!!! Project Debugging is available only coupled with Advanced Device Management

By clicking “Choose target devices…” in the dropdown, it is possible to add a target device not physically connected the the development machine. This way, projects can be verified for such target, but obviously not uplinked.
The device discovery algorithm tries its best to infer the type of the connected device, but there are situations where this is not feasible without user intervention. In such cases, the discovered device is reported as “ambiguous” and the final choiche on the device type is left to the user.
Once a device has been connected, the buttons to the right of the device list allow the following interactions:
-
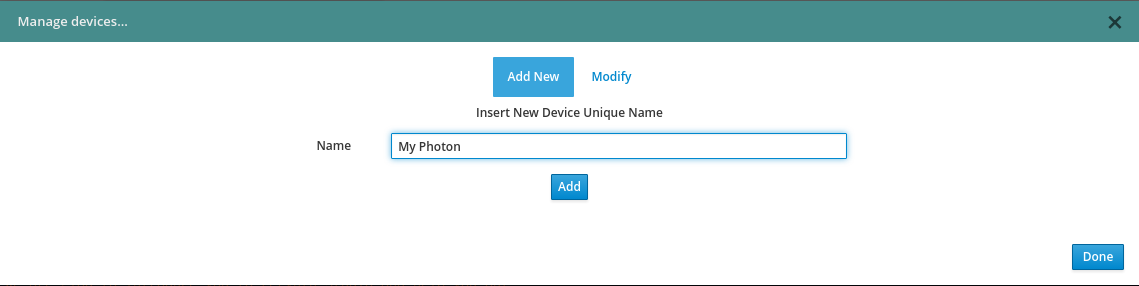
Device Registration & Virtualization: by clicking the “Z” button, a registration and virtualization dialog is displayed. If the target device has never been connected before, the only possible action is to register the device. The registration procedure is necessary to retrieve enough device information for allowing the Zerynth backend to build a virtual machine for the device. Once registration has been performed, the user is given the option to create a Virtual Machine for the registered device. Here the user can select one of different virtual machines compatible with the target device. Finally, the created Virtual Machine can be virtualized (i.e. burned on the device). Some devices cannot be recognized automatically; for these devices, the dialog provides some more options to be specified before the actual registration/virtualization can take place. Finally, a device can always be registered again with the dedicated dialog button.
-
Redeem licenses: upon registering a new device the option to acquire a license is given; the redeem process requires inserting a special code, often provided by the hardware vendor for Zerynth powered devices. The inserted code will transfer into the user account a certain amount of virtual machines licenses.
-
Serial Console: by clicking the rightmost button,the serial port of the target device can be opened and the output inspected.
-
Device information and PinMap: the central buttons can be used to retrieve device information (expecially the serial port and/or the mounted volume) and to show the device pinmap. Please refer to the Programming Guide section for more details on how pin names and functionalities are organized in Zerynth.

When a serial console is opened, the port parameters are automatically configured to the defaults of the selected device. The baud rate for a device is displayed during bytecode upload. To open a serial port configured with a non default baudrate, a serial terminal like Putty should be used. It is important to close the serial terminal before trying to uplink or open a Zerynth serial console, because concurrent serial port usage from different programs is not allowed.

Note
The Zerynth Studio serial console also has scroll lock and clear all console functions accessible from the top right corner of the console
The Getting Started section has a dedicated tutorial on how to manage devices.
Advanced Device Widget
Zerynth Studio gives the possibility to configure the connected devices in more details, overriding the automatic discovery process. This feature is particularly useful when the device needs to be registered, virtualized and programmed using a JTAG/SWD probe. To access the advanced device management mode the corresponding option must be selected in the device management widget.

Once in advanced mode, new device configurations can be created and filled with the following details:
-
port: the serial port exposed by the device (a list of available serial ports is automatically suggested)
-
disk: some devices are seen as mass storage disks (a list of available disks is automatically suggested)
-
probe: most used JTAG/SWD probes are supported and can be selected

 In advanced mode, the behaviour of the “Z” button, console button and uplink button are modified:
-
the console is available only if a port has been specified in the device configuration
-
the “Z” button functions will be perfomed using the specified port or disk; if a probe is specified, it will take priority and all registrations and virtualizations will be performed via JTAG/SWD (for the devices supporting the feature)
-
the uplink button will use the configured port; again, if a probe is specified, it will take priority and the uplinking will be performed via JTAG/SWD
Furthermore Project Debugging is enabled.
Device configurations and the device management mode are remembered across Studio restarts (but not across different development machines). Device configurations can be deleted and modified. Some systems assign different devices parameters upon device reconnection (i.e. a different serial port): such changes are not automatically recognized in advanced mode and must be reconfigured manually!
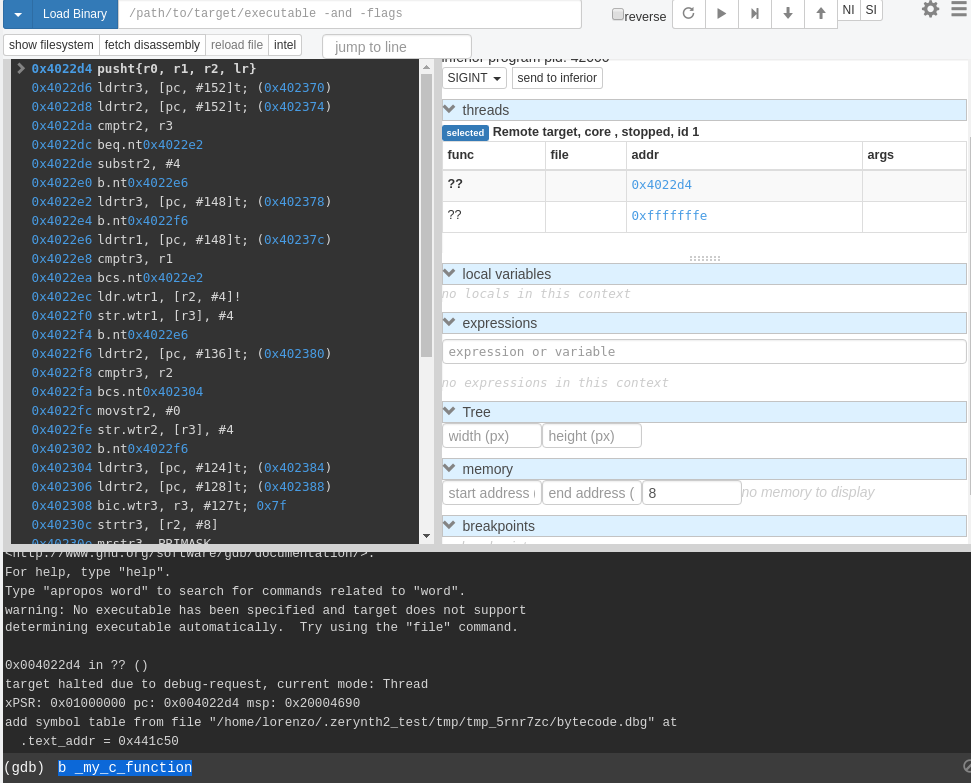
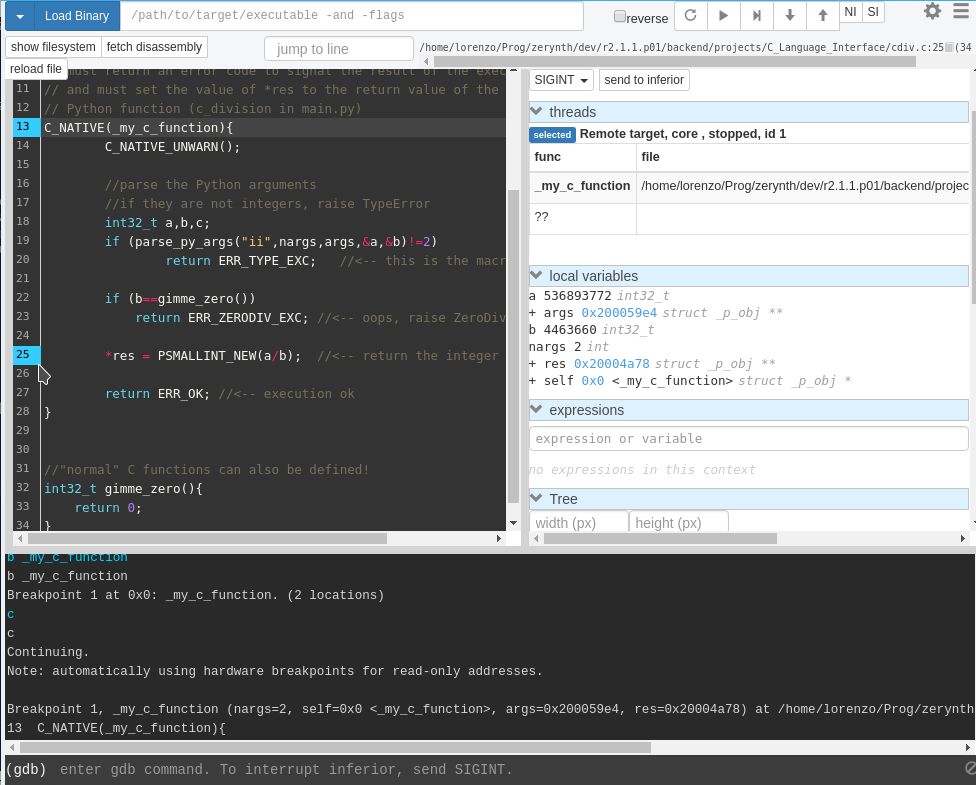
C Code Debugger
Zerynth Studio integrates the powerful gdbgui as a GDB Front End to allow debugging with ease the C component of hybrid C/Python projects.
Clicking the Debug Session button, current project is uplinked via JTAG/SWD and a gdbgui window is open.

Inside gdbgui it is possible to place breakpoints on and inside C functions to control execution flow, inspect MCU memory and C variable values.
Zerynth Account Profile Section
Zerynth Studio provides all Zerynth Account Profile information in the Profile Section that can be accessed by clicking the profile icon at the top right of the screen.
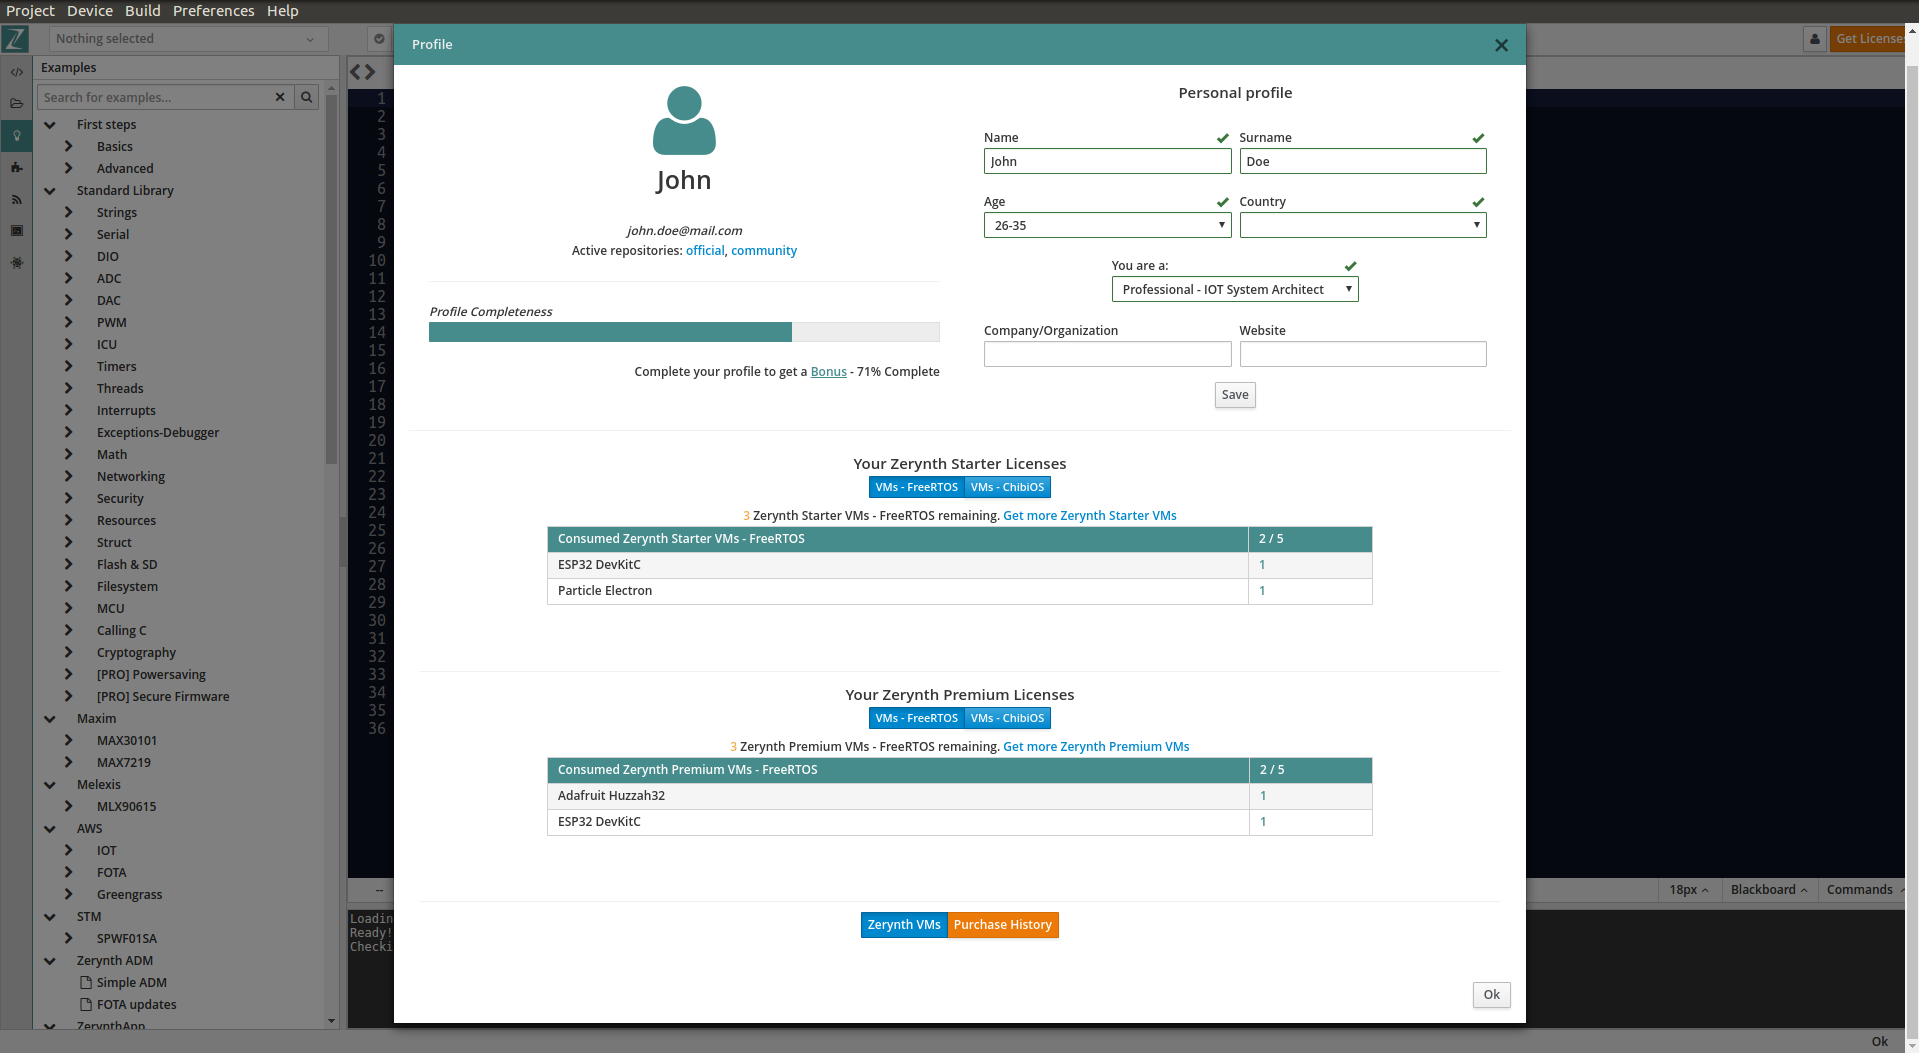
The Profile Section is divided into five main area:
-
Account Info;
-
Personal Info;
-
Zerynth Starter Licenses Info;
-
Zerynth Premium Licenses Info.
-
History Purchase Info.
Account Info Area
In this section the Zerynth User can retrieve the username and email inserted during the registration sequence.
“Active Repositories” field shows the list of library repositories available to the specific Zerynth User. The “Profile Completeness” bar shows the completion percentage of the user personal profile form.
Personal Info Area
This area show all the personal information. The Zerynth User is free to fill the form, inserting the name, last name, age, country, job, company/organization and website.
After clicking the “save” button, the inserted information are stored and profile completeness percentage are recalculated.
Zerynth Starter Licenses Section
In this section the Zerynth User can monitor the status his Zerynth Starter assets in different views related to the available and supported real time operating system:
-
VMs - FreeRTOS: the table shows how many Zerynth Starter VMs with FreeRTOS have been consumed out of the total owned, including the detail about the distribution of the consumed VMs among the user devices;
-
VMs - ChibiOS: the table shows, as above, the status of the available and consumed Zerynth Starter VMs with ChibiOS.
Zerynth Premium Licenses Section
In this section the Zerynth User can monitor the status his Zerynth Premium assets in different views related to the available and supported real time operating system:
-
VMs - FreeRTOS: the table shows how many Zerynth Premium VMs with FreeRTOS have been consumed out of the total owned, including the detail about the distribution of the consumed VMs among the user devices;
-
VMs - ChibiOS: the table shows, as above, the status of the available and consumed Zerynth Premium VMs with ChibiOS.
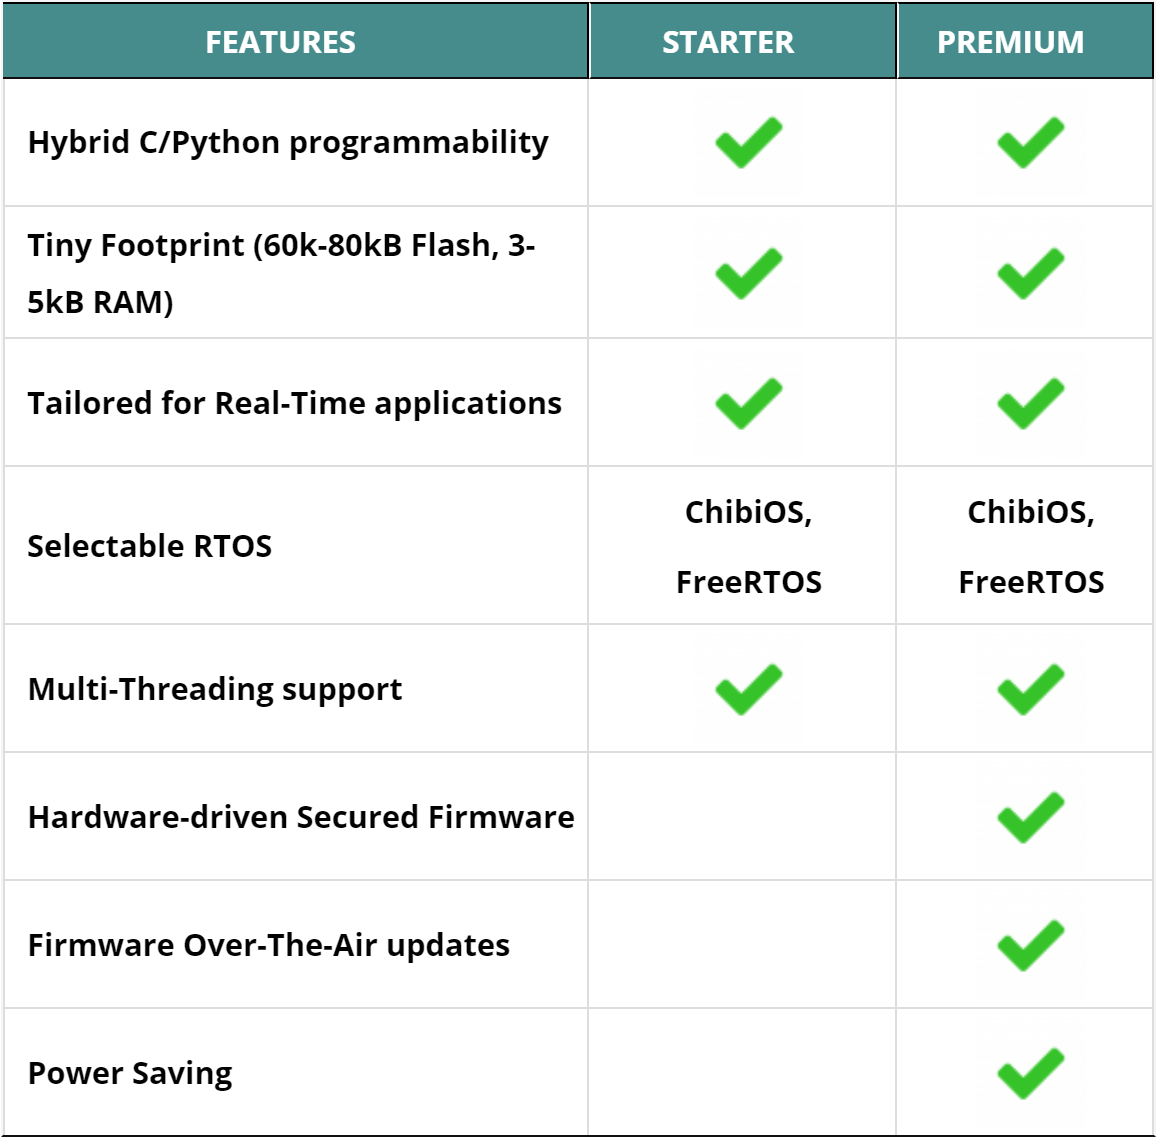
Note
The difference between Starter and Premium is related to the Zerynth Virtual Machine features:
-
a Starter VM is a basic virtual machine.
-
a Premium VM is a virtual machine with special features like FOTA (Firmware Over The Air), Powersaving, Secure Firmware, or combination of them.
Purchase History Section
By clicking the orange “Purchase History” button, the Purchase History table is displayed. 
Through this table the user can retrieve all the information about the owned assets ordered by date with description and creation date; the receipt number is also indicated for purchased assets.
Code Editor
Zerynth Studio integrates a code editor based on the powerful Ace .
The topmost part of the editor is reserved for tabs. Each tab displays a single project file and files belonging to different projects can be kept open at the same time.
At the bottom of the editor, a status bar displays information about the currently opened file together with a series of menus to alter the editor font and theme. The rightmost menu contains the useful editor commands.

Keyboard shortcuts are available:
-
ctrl+c/ctrl+v/ctrl+x: copy/paste/cut -
ctrl+z/ctrl+y: undo/redo -
ctrl+f: find in the current file -
ctrl+g: find next -
ctrl+shift+g: find previous -
ctrl+h: find and replace -
ctrl+\\: comment/uncomment selected lines -
tab: indent more -
shift+tab: indent less -
ctrl+alt+8: auto pep8 (check and modify the script according to Python Enhancement Proposals 8 style convention) -
for more shortcuts refer to the Ace shortcut page
The Left Panel
The vertical panel located to the left of the screen displays different information panels that can be selected by clicking one of the vertically stacked icons.
Project View
The topmost icon selects the currently open project and the folder tree is shown. A double click on a project file opens it in the code editor.
The user can open more than one project and can switch from a project to another by selecting it from the project top bar.

Project related commands can be accessed both from the system menu and from the dropdowns in the top right corner of the project view. 
Note
Drag and Drop feature is available for the project view

Projects Browser
All projects known to Zerynth Studio are listed in the projects browser panel. Projects are grouped into “workspaces”, where a workspace is the parent folder that contains them. Different workspaces are automatically added and removed to the projects browser as soon as a new project is created or the last project in a workspace is deleted, respectively. Projects are also “tagged” by an icon with the following meaning:
-
closed folder: project save locally
-
folder with git fork icon: project is saved remotely on the Zerynth backend
-
folder with a book icon: project has been published as a library package

Examples Browser
Zerynth Studio integrates an Example browser from which code examples can be cloned into projects. Examples are organized in a tree where different branches are usually labelled with the package namespace that provides them.

In the Getting Started section a dedicated tutorial on how to use examples is available.
Library Manager
Zerynth Studio can be extended with new libraries from our community of users; these features are managed from the Library Manager panel, accessible by clicking the “puzzle” icon on the Left Panel

To search and install a library:
-
type keywords in the search box and a list of matching libraries will be displayed.
-
choose “Install” or “Update” from the library info card
-
click “Install” in the summary popup for the library after choosing the version
A the top right corner of the Library Manager panel, a “refresh” button allows retrieving an updated list of the available community libraries. The list is refreshed automatically by Zerynth Studio every hour.
In the Getting Started section a dedicated tutorial on how to search, install and import packages is available.
News Feed
Zerynth Studio is also a tool to stay connected with the Zerynth community. The “News Feed” tab displays the latest news available in the community forum about packages, updates, releases and bug fixes.
Console List
Each device output can be monitored through a dedicated serial console and each console lives in its own window. The console list panel is useful rapidly focus or close an opened console.

ADM connected devices
Devices present in the ADM database are shown in this panel. For each device, information about its status is displayed. If the device supports FOTA updates, the FOTA process can be performed directly from the provided buttons. More information on the ADM and FOTA updates can be found here and here.

Custom Virtual Machines
Custom Virtual Machines can be created and managed directly from Zerynth Studio. A new custom VM can be created by accessing the dropdown menu on the right side of the panel title. In particular a new VM can be created:
-
from scratch (Add VM option)
-
by importing VM packages created by other users (import from file option)
-
by importing the custom VM from a Github repository (import from Github)

By selecting option 1 a popup dialog is displayed asking for some info:
-
the name of the custom VM (must be at most 31 lowercase characters with at most one underscore)
-
the name of the custom device hosting the custom VM (it will appear on the Device Management Widget)
-
the customizable VM to use as a starting point

Once created, the custom VM will appear in the panel with a series of buttons (in order from left to right):
-
edit button: open the Yaml template file where the VM customization takes place. The standard template is heavily commented and contains all the info to successfully configure a custom VM
-
compile button: before being able to use a custom VM, it must be compiled starting from the info contained in the Yaml template.
-
remove button: permanently deletes the custom VM. Not that custom VMs are not saved to the Zerynth servers, so be careful!
-
export button: creates a package containing the custom VM details. Such package can be shared with other Zerynth users enabling them to use the custom VM.
-
Github button: pushes the custom VM to a Github repository
System Log
Zerynth Studio also includes a System Log Panel under the code editor where all system messages are reported. The displayed messages usually comes from the output of ZTC commands executed under the hood by Zerynth Studio. In case of error a full traceback of the exception can be generated: it should be copied and reported on the community forum to have it solved and fixed.
The Footer Bar
A the bottom of the Zerynth Studio main window a footer bar displays two types of information:
-
On the leftmost part, notification buttons appear when system updates or new supported boards are released. By clicking on the notification, the update process is started.
-
On the rightmost part, a busy indicator appears during operations that takes some time to complete, like compiling, uplinking or updating the system
Note
When new versions of Zerynth Studio or of the Zerynth Toolchain are released, a manual restart of the Studio is required. The update process is non-disruptive and the previous working version of Zerynth Studio is preserved so that it can be started in case the new version has failed updating correctly.
Quick Search
Zerynth Studio has a quick search feature accessed through the shortcut Ctrl+P. The quick search bar allows to search projects, examples and installed packages rapidly. Each search result is tagged with a type that can be proj for projects, ex for examples and and doc for package documentation.
The quick search bar has some advanced features. It is possible to prefix the search query with the type of the desired result followed by a colon in order to restrict the search to the specified type. For example, typing proj:blink displays only the projects that match the query term “blink”.
Finally, by typing :ztc followed by a ZTC command, the specified command is executed and the output is shown in the System Log.

Preferences Menu
In the Zerynth Studio Preferences Menu, following options are available:

-
Profile: Opens the Profile Section; -
Remove Installation: Lists of old installation instances that can be removed;
-
Clean temp folder: Deletes all file in tmp folder under Zerynth Studio folder;
-
Forget all devices: Forgets all devices stored in local database (virtual machines are not involved);
-
Show messages: Shows the list of all received messages;
-
Check Updates: Manual trigger to check if new updates are available.
-
Redeem Licenses: Open up a dialog where redeemable codes can be turned into virtual machine licenses.
Note
the “Forget all devices” option is needed when there are one or more errors in recognizing devices connected to the machine. Confirming this command local device database will be cleaned.